
We get a lot of questions about leak prevention when talking about our greenhouse products. Especially when these are mounted over delicate plants.
To answer the question, Yes. Our Misters and Foggers contain built-in check valves that prevent leakage when a system is turned off. They also help assure a consistent start-up time when the system is turned back on. For this month’s Tech Tip, we want to show you what the check valves and corresponding seal supports look like. You’ll notice that even though all these products look very similar on the outside, they have some internal differences that enhance each product’s performance.
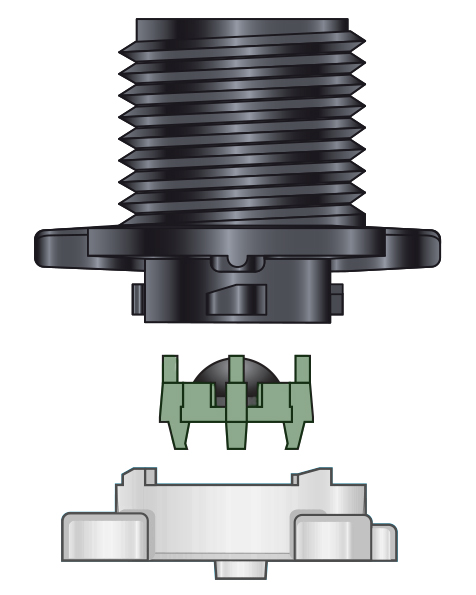
Foggers are commonly used for temperature control inside greenhouses. Their check valve sits on a green seal support that closes the swirl chamber in the nozzle. This design forces the circulating water into the inner nozzle chamber, which generates the desired fog as it exits the nozzle orifice.
Inverted Misters also contain a built-in check valve and their design varies slightly depending on the nozzle size:
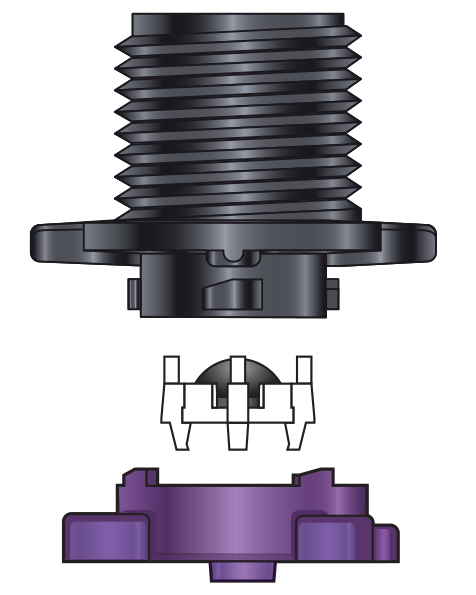 Misters with a #12 (blue), #16 (purple) or #20 (black) nozzle have their check valve sit on a white seal support that creates much bigger droplets than a Fogger. This is due to their built-in orifice that allows rapid water passage, producing a mist with larger droplets.
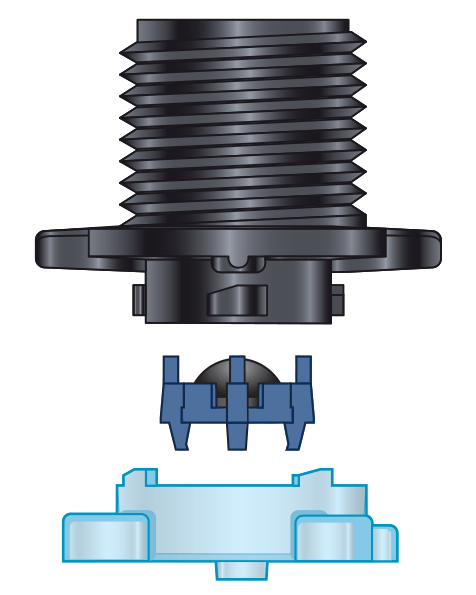 Misters with the smallest orifice size, a #8 (light blue) nozzle, contain a check valve that sits on a dark blue seal support. This seal also contains an orifice, but in contrast to the white one, the dark blue seal has grooves next to the orifice that generate more turbulence and help produce a mist at lower flows.
Upright Misters contain a flat light blue seal support that provides the same rapid water passage as in the inverted model to produce a mist. They can be ordered with a check valve to help ensure consistent start-up and shut-off.
While each product has a different check valve configuration, all products are taken apart for servicing the same way.
Disassembly
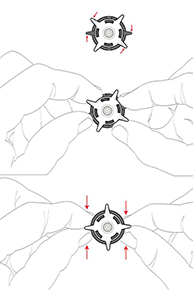
1. Firmly grasp the Fogger nozzle and base by the pointed ears.
2. Pinch the pointed ears together until you hear a click, indicating the sprinkler is open.
3. Position the colored nozzle towards the ground so that the black base will be facing up. Carefully remove the base from the Fogger nozzle, which contains the built-in check valve assembly.
4. Carefully lift the check valve assembly to clean the nozzle.
Reassembly
1. Holding the colored nozzle facing toward the ground, carefully place the check valve assembly* into the nozzle with the rubber seal facing out. Note: If you decide to remove the check valve assembly, we recommend using another check mechanism to help avoid leakage when the system is turned off.
2. Add the black base so that the tabs on the base align with the grooves on the inside of the nozzle. If it is easier, align the ears on the base with the ears on the nozzle.
3. Twist the ears of the base in the opposite direction from the ears on the nozzle until it locks together.
*If the check valve assembly comes apart, please re-insert the rubber seal into the seal support. Make sure the edges of the seal are pressed completely into the groove that surrounds the check valve seal support.